Top 15 At-Home Workouts
1. Supine Reverse CrunchesAdvanced crunch that targets the entire core region. If you feel pain in your back – STOP.  Step 1Starting Position: Lie in a supine (on your back) position on a mat with your knees bent, feet flat on the floor and arms spread out to your sides with your palms facing down. Gently exhale, stiffen your torso by contracting your abdominal/core muscles (“bracing”) and slowly lift your feet off the floor, raising your knees directly above your hips while maintaining a 90 degree bend in the knees. Hold this position and breathe normally. Use your arms as a balance support. Step 2Upward Phase: Exhale, contract your abdominal, core and hip flexor muscles and slowly raise your hips off the mat, rolling your spine up as if trying to bring your knees towards your head (your hips and pelvis should move towards your rib cage). Avoid any change in the angle of your knees during the roll-up. Use your arms and hands to assist with maintaining your balance and continue to curl-up until your spine cannot roll any further. Hold this position briefly. Step 3Downward Phase: Gently inhale and lower your spine back towards the mat in a controlled fashion, moving your upper thighs backwards until they are positioned directly over your hips. Continue rolling out until your spine and pelvis (hips) contact the mat and your knees are positioned directly over the your hips with a 90 degree bend with your lower leg. Proper form is important when performing this exercise to prevent excessive stresses on your low back. When returning to your starting position during the repetitions, control your leg movement ensuring that your knees don’t move past your hips, but instead return to a position directly above your hips. Since the abdominals connect the rib cage to the pelvis, the emphasis of the movement should be on pulling your pelvis upwards towards your rib cage.
|
|
2. CobraThis is my “good morning, time to wake up” exercise – great way to get ready for a busy day. 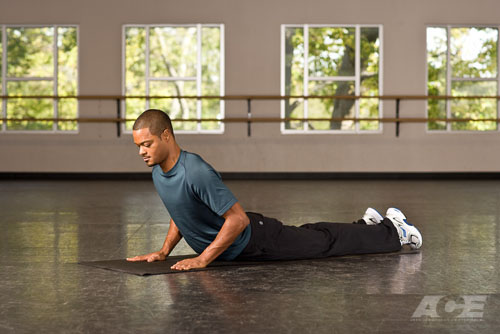 Step 1Starting Position: Lie prone (on your stomach) on an exercise mat or floor with your hands by your sides, positioned directly under your shoulders and hands facing forward. Extend your legs and plantar flex your ankles (toes point away from body). Step 2Upward Phase: Gently exhale and press your hips into the mat or floor and pull your chest away from the ground while keeping your hips stable. This will arch your low back and stretch the muscles in your chest and abdominal region. Hold this position for 15 – 30 seconds Step 3Downward Phase: Gently relax and lower your upper body to rest back upon the mat or floor. Step 4If you experience any pain in the low back with this movement, stop the exercise immediately and consult with your doctor. As the length of arms differ, individuals may often lift their hips off the mat or floor as they fully extend their arms. In this case, limit the extension in your arms to keep the hips on the mat.
|
|
3. Squat JumpsA bit of heart rate work while working on total body movement. 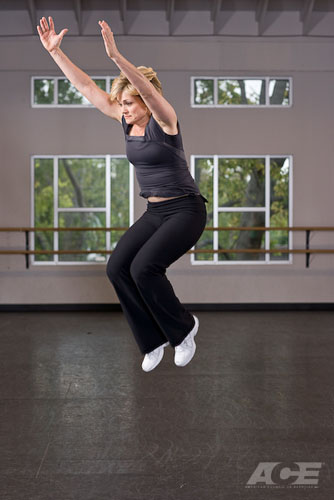 Step 1Starting Position: Stand with your feet feet hip-width apart, arms by your sides, depressing and retracting your scapulae (pull shoulders down and back) without arching your low back, and “brace” (engage your abdominal / core muscles) to stiffen your spine. Step 2Downward Phase: Begin your downward phase by first shifting your hips backwards then slowly moving downwards to create a hinge-like movement at your knees. Continue to lower yourself until your feel your heels about to lift off the floor. Try to maintain a flat back by bending forward at the hips, keep your head facing forward and position to your arms where comfortable or where they offer the greatest degree of balance support. Step 3Jumping Movement: With ONLY a very brief pause at the bottom of your downward phase, explode upwards through your lower extremity, achieving triple extension (pushing and extending your ankles, knees and hips simultaneously). As you jump into the air, keep your feet level with each other and parallel with the floor. Step 4Landing: The most important components of the landing phase are correct foot position and avoiding excessive forward movement in your lower extremity which places additional stresses upon your knees. Step 5Attempt to land softly and quietly on the mid-foot, rolling backwards quickly towards the heels. Always push your hips backwards and drop them downwards to absorb the impacting forces associated with jumping. Avoid locking out your knees or quads on your landing as this may lead to potential knee injuries Step 6Land with your trunk inclined slightly forward, head aligned with your spine and back rigid or flat. Keep your abdominal / core muscles engaged, stiffening your torso to protect your spine. Step 7Exercise Variation: As you develop your jumping and landing skills, you can increase the exercise intensity and complexity by: (1) Driving your arms behind you during the downward phase (illustrated), (2) driving your arms forward and upward during the jumping phase (illustrated), or (3) driving your knees towards your chest during the jumping phase. It is suggested, you first learn how to squat and land before attempting to jump. Once you have mastered the hip-hinge mechanism, begin with small jumps, but emphasize your landing mechanics. Only progress to more explosive jumps once you have mastered your landing mechanics.
|
|
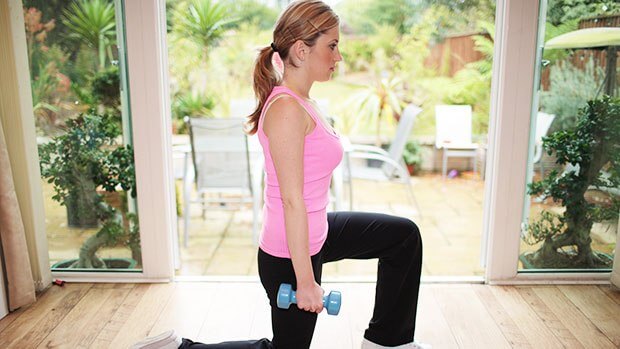
4. Forward LungeIf I could only do one leg exercise for the rest of my life, a lunge would be my choice. 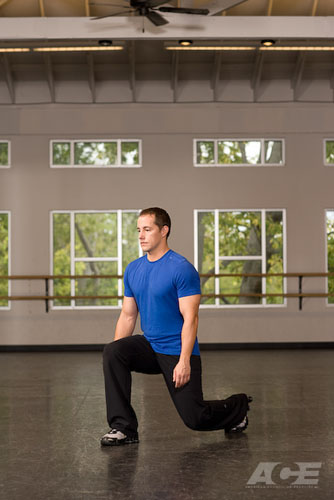 Step 1Starting Position: Stand with your feet together. Depress and retract your scapulae (pull your shoulders down and back) without arching your low back, and “brace” (engage your abdominal/core muscles) to stiffen your spine. Step 2In preparation to step forward, slowly lift one foot off the floor, stabilizing your body on the stance (supporting) leg. Avoid any sideways tilting or swaying in your upper body and try not to move the stance (supporting) foot. Hold this position momentarily before stepping forward. The raised (swing) leg should initiate contact with a heel strike first, slowly transferring your body weight into the leading (forward) foot placed firmly on the floor. As you load into this leg, avoid any sideways tilting or swaying in your upper body and try not to move the stance (supporting) foot. Step 3As you lunge forward, focus more on dropping your hips towards the floor rather than driving your hips forward. This will help control the amount of forward movement of your shinbone (forward tibial translation) over your foot. Continue lowering your body to a comfortable position or until your front thigh becomes parallel with the floor and your tibia (shinbone) is in a slight forward lean. While lunging, simultaneously, bend forward at your hips, maintaining a flat back. Step 4Firmly push off with your front leg, activating both your quads and glutes (thighs and butt muscles) to return to your upright, starting position. We suggest you first learn how to perform single leg-stands on the ground before performing this forward lunge. Once you master the forward lunge, you can progress to doing a lunge using arm drivers and mult-directional glute activation lunges.
|
|
5. Forward Lunge with Arm DriversStart with the regular lunge and work up to this advanced exercise hitting some core areas. 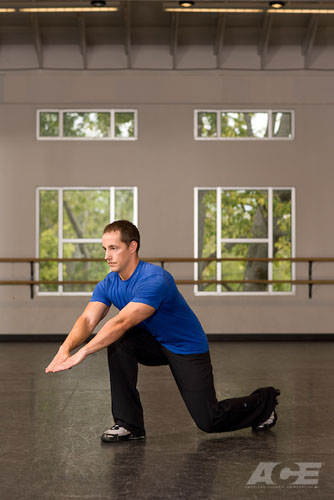 Step 1Starting Position: Stand with your feet together and your arms raised in front to shoulder height, with your elbows fully extended. Depress and retract your scapulae (pull your shoulders down and back) without arching your low back, and “brace” (engage your abdominal / core muscles) to stiffen your spine. Step 2In preparation to step forward, slowly lift one foot off the floor, stabilizing your body on the stance (supporting) leg. Avoid any sideways tilting or swaying in your upper body and try not to move the stance (supporting) foot. Hold this position momentarily before stepping forward. The raised (swing) leg should initiate contact with a heel strike first, slowly transferring your body weight into the leading (forward) foot placed firmly on the floor. As you load into this leg, avoid any sideways tilting or swaying in your upper body and try not to move the stance (supporting) foot. Step 3As you lunge forward, focus more on dropping your hips towards the floor rather than driving your hips forward. This will help control the amount of forward movement of your shinbone (forward tibial translation) over your foot. Continue lowering your body to a comfortable position or until your front thigh becomes parallel with the floor and your tibia (shinbone) is in a slight forward lean. While lunging, simultaneously, bend forward at your hips, maintaining a flat back and drive your extended arms towards the floor in front of you (hands should reach somewhere below your knees). This increases the load on your gluteal muscle group. Step 4Firmly push off with your front leg, activating both your quads and glutes (thighs and butt muscles) to return to your upright, starting position. It is suggested, you first learn how to perform single leg-stands on the ground and forward lunges before progressing to using arm drivers.
|
|
6. Glute Activation LungesOften missed, this Gluteus workout is the MAXIMUS.  Step 1Starting Position: Stand with your feet together and your arms raised in front to shoulder height, with your elbows fully extended. Depress and retract your scapulae (pull your shoulders down and back) without arching your low back, and “brace” (engage your abdominal/core muscles) to stiffen your spine. Step 2From the same starting position, step out sideways with the right foot (both feet remain pointed forward) to the 3 o’clock position. Once the foot is firmly placed on the floor, begin to bend at the hips, pushing them backwards while simultaneously shifting your weight over that same foot. Continue shifting your weight until your tibia (shinbone) is vertical to the floor and your knee is aligned directly over the second toe of that foot. Your left leg should be near, or at full extension while keeping the right foot flat. The heels of both feet should stay flat on the floor.
Step 3While lunging, simultaneously move your arms and lean your torso in the opposite direction to the lunge movement, increasing the load on your glute muscle group. Firmly push off with your front leg, activating both your quads and glutes (thighs and butt muscles) to return to your upright, starting position. Step 4From the same starting position, step with one foot in front and across the body (both feet remain pointed forward). Once the foot is firmly placed on the floor, begin to bend at the hips, pushing them backwards while simultaneously shifting your weight over that same foot. Continue shifting your weight until your tibia (shinbone) is vertical to the floor and your knee is aligned directly over the second toe of that foot. Your opposite leg should be flexed with the heel off the ground.
Step 5While lunging, simultaneously rotate your torso and arms in the opposite direction to the lunge movement, increasing the load on your gluteal muscle group. Firmly push off with your front leg, activating both your quads and glutes (thighs and butt muscles) to return to your upright, starting position. This series of multi-directional (multi-planar) lunges are intended to activate your glutes which protect your knee during walking, running and jumping-type activities. As many of us have weak glutes, this exercise can be performed as part of your pre-exercise warm-up. Given the moderate degree of complexity of the three movements, we recommend learning this exercise first without your arms and only progress to the arm drivers as you feel comfortable. It is suggested, you first learn how to perform single leg-stands on the ground and forward lunges before performing these glute activation lunges.
|
|
7. Glute BridgeReal people do yoga – and this is a great entry exercise to the power of slow and controlled movements. 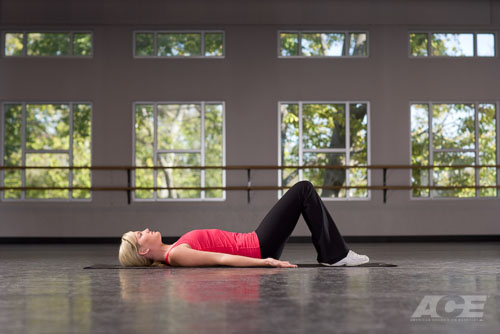 Step 1Starting Position: Lie supine (on your back) on an exercise mat or the floor in a bent-knee position with your feet flat on the floor. Place your feet hip-width apart with the toes facing away from you. Gently contract your abdominal muscles to flatten your low back into the floor. Attempt to maintain this gentle muscle contraction throughout the exercise Step 2Upward Phase: Gently exhale while holding your abdominal contraction and press your hips upwards off the floor into extension by contracting your glutes (butt muscles). At the same time press your heels into the floor for more stability. Avoid pushing your hips too high as this generally increases the amount of hyperextension (arching) in your low back. Maintaining your abdominal contraction helps avoid excessive arching in your low back. Step 3Lowering Phase: Inhale and slowly lower yourself back towards your starting position. Step 4Progression: Gradually progress this exercise by starting with both feet together and extending one leg while in the raised position. Avoid arching your lower back as your press your hips upward which normally occurs if your attempt to push your hips as high as possible. This can be achieved by contracting your abdominal muscles prior to lifting, and keeping them engaged throughout the lift
|
|
8. Hip Rotations (Push-up Position)I’ve always had problems finding a good hip exercise – do this before any push-up exercises so you can stabilize your body before fatigue. 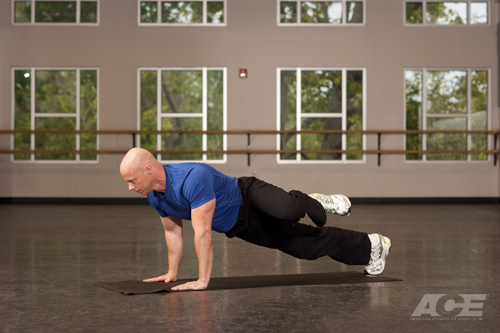 Step 1This exercise is a dynamic movement exercise used to prepare the body for activity. As it involves a modification to a traditional push-up, it is highly recommended you master your push-up technique before attempting this exercise. Step 2Starting Position: Kneel on an exercise mat and bring your feet together behind you. Slowly bend forward to place your palms flat on the mat, positioning your hands shoulder-width apart with your fingers facing forward or turned slightly inward. Slowly shift your weight forward until your shoulders are positioned directly over your hands. Reposition your hands as needed to allow full extension of your body without any bend at the hips or knees. Stiffen your torso by contracting your abdominal / core muscles (“bracing”)and glutes and quadriceps (butt and thigh muscles), and align your head with your spine. Place your feet together with your ankles dorsiflexed (toes pointed towards your shins). Step 3Rotational Movement: Exhale and gently draw one knee up towards your chest, bending the knee and flexing at the hip. Do NOT allow your hips and low back to pitch upwards or sag down towards the floor. Step 4In this knee-tuck position, rotate your hips to move your bent leg across the front of your torso, but avoid rotating or dropping your hips. Continue to move until your hips cannot rotate any further. Your head and shoulder should remain level throughout the exercise. Pause very briefly. Step 5Rotate in the opposite direction (away from your torso), rotating until your hips cannot rotate any further without movement in your spine. Your head and shoulder should remain level throughout the exercise. |
|
9. Side LungeAdvanced in terms of needing to include some movement into what becomes a static pose. 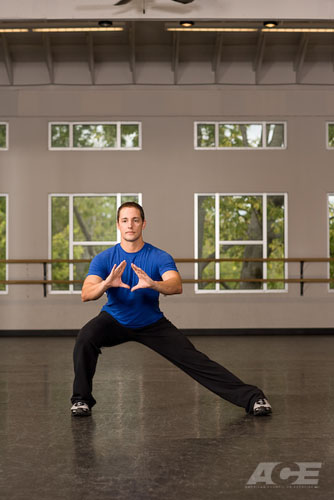 Step 1Starting Position: Stand with your feet parallel facing forward and hip-width apart. Position your hands where comfortable to help you maintain your balance during the exercise. Stiffen your torso by contracting your core and abdominal muscles (“bracing”). Keep your head facing slightly upwards and shift your weight onto your heels. Step 2Inhale and gently unload your right leg, slowly stepping to the right while keeping your weight over your heels and both feet facing forward. Once your right foot is firmly placed on the floor, bend at the hips, pushing them backwards while simultaneously shifting your weight towards the right foot. Continue shifting your weight over the right foot until your tibia (shinbone) is vertical to the floor and your right knee is aligned directly over the second toe of your right foot. Your left leg should be near, or at full extension at the knee and your body weight should still be distributed into the right hip. The heels of both feet should stay flat on the floor. Keep your left foot flat on the floor as you allow your weight to shift into your right hip and alternate. Feel free to position your arms where necessary to help maintain your balance, reaching for your right foot with your left hand will emphasize hip flexion (alternate with the right hand reaching for the left foot). Step 3Exhale and push off firmly with your right leg, returning your body to your starting position. Repeat the movement for the opposite side. A common mistake when performing a side lunge is that individuals often step too wide and are unable to align the tibia (shinbone) over the placed foot and the knee falls inside the foot. In this case, simply shorten the width of the step taken to allow you to align the tibia over the placed foot.
|
|
10. Side Lying Hip AbductionA common mistake is raising the leg too high in this exercise. Small but effective movement. 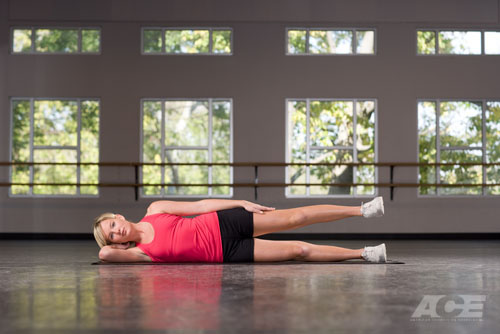 Step 1Starting Position: Lie on your side on a mat/floor with your legs extended straight away from your body. Hold your feet together in neutral position (at 90 degrees to your shinbone) and your lower arm bent and positioned under your head for support, while the upper arm rests upon your upper hip. Your hips and shoulder should be aligned vertically to the floor. Your head should be aligned with your spine. Step 2Upward Phase: Exhale and gently raise the upper leg off the lower leg while keeping the knee extended and the foot in a neutral position (avoid flexion and extension). The hips should remain vertical to the floor and the knee of the raised leg should point straight away from you (do not rotate upward towards the ceiling or downward towards the floor). Continue raising the leg until the hips begin to tilt upwards or until your feel tension develop in your low back or oblique muscles. Step 3Downward Phase: Gently inhale and slowly return your raised leg to your starting position in a controlled manner. After completing your set, roll over and repeat with the opposite leg. A common mistake is raising the leg too high in this exercise. Given the design of the hip joint, the thigh can only abduct (move out sideways) to 45 degrees. Any movement beyond that position involves movement of the entire hip and no longer targets the muscles intended for this exercise.
|
|
11. Side Lying Hip AdductionEven smaller movement than Abduction but equally important. 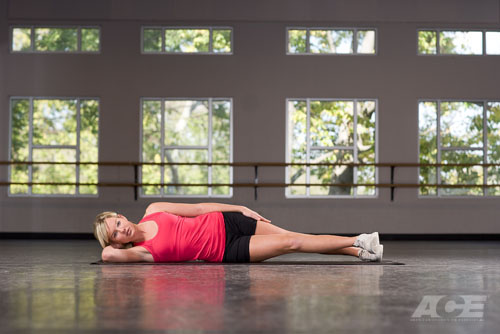 Step 1Starting Position: Lie on your side on a mat/floor with your legs extended, feet together in neutral position pointing away from your body (at 90 degrees to your shinbone). Keep your lower arm bent and positioned under your head for support while the upper arm rests upon your upper hip. Your hips and shoulder should be aligned vertically to the floor. Your head should be aligned with your spine. Slowly flex (move forward) your lower leg until it lies in front of your upper leg. Rest both feet on the floor and keep both legs extended with feet in neutral position. Step 2Upward Phase: Exhale and gently raise the lower leg off the floor while keeping the knee extended and the foot in a neutral position. The hips should remain vertical to the floor (knee of the raised leg should not rotate upward towards the ceiling or downward towards the floor). Continue raising the leg until your hips begin to tilt sideways or until your feel tension develop in your low back or oblique muscles. Step 3Downward Phase: Gently inhale and slowly return the raised leg to your starting position in a controlled manner. After completing your set, roll over and repeat with the opposite leg. Due to the limited movement at the hip joint in this direction, the leg need only rise a few inches off the mat/floor.
|
|
12. Side Plank with Straight LegDon’t forget to breathe on this exercise – exhale on the exertion. 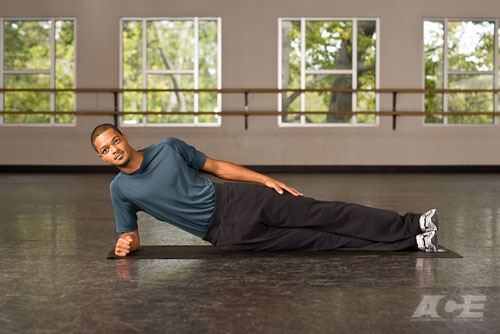 Step 1Starting Position: Lie on your right side on an exercise mat with extended legs, placing your left leg directly over your right leg and and stacking your feet one on top of the other. Place your right elbow directly under your shoulder, align your head with your spine and keep your hips and right knee in contact with the exercise mat. Step 2Upward Phase: Exhale, gently contract your abdominal / core muscles to stiffen your spine and lift your hips and knees off the mat, keeping contact with the side of your right foot and keep head aligned with your spine. Keep your right elbow positioned directly under your shoulder. Step 3Lowering Phase: Inhale and gently return yourself to your starting position. Alternate sides and repeat. Step 4Exercise Variation: You can increase the intensity of this exercise by (1) increasing the length of time you are in the raised position, (2) raising the upper leg off the lower leg or (3) raising the lower leg off the floor and maintaining contact with your elbow and the foot of the upper leg only. When raising the upper leg off the lower leg, there is no need to raise it to a level beyond parallel with the floor.
|
|
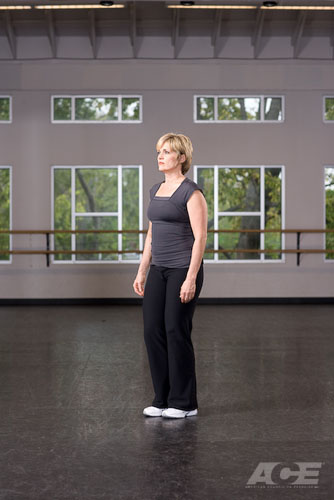
13. Single Leg StandI do this one while brushing my teeth in the morning – some call it crazy, I call it multi-tasking.
Step 1Starting Position: Stand with both feet together or spread a few inches apart (2-3″), but parallel with each other. Depress and retract your scapulae (pull your shoulders down and back) while simultaneously engaging (contracting) your abdominal muscles to avoid any excessive arching in your low back. Bend your knees slightly and keep your abductors and adductors under tension (contract your inner and outer thigh muscles). This will help control against excessive hip adduction (sideways shift) during the single-leg stand. Step 2Movement: Slowly lift one leg 3-6″ off the floor, stabilizing your body on the stance (supporting) leg. Avoid any sideways tilting or swaying in your upper body and try not to move the stance (supporting) foot. Hold for 10-15 seconds before returning the raised foot to the floor. Perform an equal number of repetitions with each foot. Step 3Exercise Variation: Increase the intensity of this exercise by going through the following progressions (1) lift the one leg higher off the floor (illustrated) to further raise your center of mass, (2)raise both arms overhead (3) lift one arm to your side, (4) tilt your head, (5) close your eyes then finally (6) close your eyes and tilt your head. Try to perform this exercise in front of a mirror initially so that you can watch and control the degree of hip adduction (sideways shift) over the stance (supporting) leg. Always try to minimize the degree of hip adduction as it places excessive stresses on your knee joint. While balancing on the stance leg (the foot on the ground) think about pressing your foot into the floor and squeezing your glutes (butt muscles), this will help reduce any sideways tilting. Most of us can lift one leg, but the question of the quality of movement is important. Perform your movements slowly and under control, avoiding any sudden positional changes. Perform each progression until you can execute them with good control and form. |
|
14. Standing Calf Raises – WallMy shins are my weak points, thus finding a great exercise like this to improve that area is important. 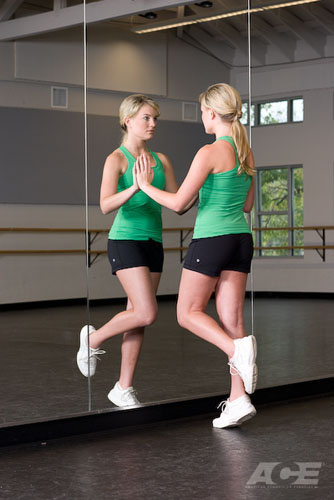 Step 1Starting Position: Stand 6 -12″ away from a wall with your feet hip-width apart and facing forward. Extend your arms to place your palms on the wall, level with your chest or shoulders. Step 2Upward Phase: Exhale and slowly lift your heels off the floor keeping your knees extended and without rotating your feet. Use your hands on the wall to support your body. Hold your raised position briefly. Step 3Downward Phase: Inhale and slowly lower your heels back towards the floor. Step 4Exercise Variation (1): Single-leg Calf Raise: From your starting position, bend your left knee to lift your left foot off the floor and perform single-leg calf raises. Repeat with your right leg. 2. Internal and External Foot Position: Turn your feet inward (to the 10 and 2 o’clock positions on a clock) or turn your feet outward (to the same clock positions) as a starting position and perform your calf raises with both feet or with a single-leg. Turning your feet inward places more emphasis on the medial (inner) muscles while turning your feet outward places more emphasis on the lateral (outer) muscles Step 5Exercise Variation (2): Modified Internal and External Foot Position: Turn your feet inward (to 10 and 2 o’clock ) or turn your feet outward (to the same clock positions) and perform your calf raises with both feet or with a single leg. Turning your feet inward places more emphasis on the medial (inner) muscles while turning your feet outward places more emphasis on the lateral (outer) muscles. The gastrocnemius (major calf muscle) contains a higher percentage of fast-twitch fibers thus is better suited to more explosive training. Therefore, once you have mastered your technique these raises can be performed more explosively (with greater power and force) so you can gain greater benefits from the exercise.
|
|
15. Supine Pelvic TiltsMay not look like an abdominal exercise, but you will feel the burn after a set of these. 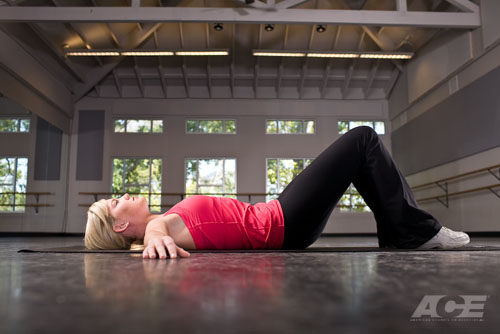 Step 1>Starting Position: Lie supine (on your back) with your knees bent and both feet flat on the mat/floor and the knees aligned with the second toe of each foot. Abduct your arms (extend to side) with the palms supinated (facing up to the ceiling). Step 2>Downward Phase: Exhale and gently contract your abdominal muscles to flatten your low back into the mat/floor. Avoid trying to lift your hips (tailbone) off the mat/floor. Hold this position briefly. Step 3>Upward Phase: Inhale and slowly relax your abdominal muscles while gently contracting your erector spinae (low back muscles) to increase the arch in your low back. Avoid raising your hips off the mat/floor. Hold this position briefly before returning to your starting position. |